How do I fix flickering lights? The problem is either with the light fixture, wiring, or the local serving utility company.
I’ll go over 12 fixes. Some you can check, while others require an electrician and/or your electric utility to step in. First though, think over the following questions to help you troubleshoot:
- Are lights from only one circuit flickering?
- Do lights on multiple circuits flicker at once?
- Where is the location of the flickering lights in your home?
- Are lights flickering, or dimming?
- Do some lights get dimmer while others get brighter?
- Do all lights on a circuit flicker, or just a couple?
- Is it the same lights flickering over and over again?
- Is the problem seasonal?

Important Note: Turn off circuits or disconnect any electronics before troubleshooting. This will prevent damage to any equipment when disconnecting and reconnecting wires.
Troubleshooting and fixes you can do

These are checks and fixes you can do. Generally speaking, flickering lights happen from loose connections. The electrical connection you can think of as going from off to on. While dimming happens when not enough current reaches your light.
We’ll go over both light flickering and dimming with each troubleshooting approach.
Troubleshooting Approach #1: loose light bulb in a socket
Check if your light bulb is tightly screwed in. This may seem like a no-brainer, but it’s often overlooked. Over time, light bulbs get loose in a socket.
So, gently wiggle the light bulb in the socket and see if it flickers. If it does, you’ve spotted your problem. If tightening the light bulb doesn’t work, replace it. The light bulb may have internal damage.
The same applies to loose light plugs. There may be a loose connection between a plug and a wall outlet. Check if your lamp’s plug is firmly in the wall socket.
Troubleshooting Approach #2: high load inrush current
When motors or any large inductive loads turn on, they draw a lot of current. In return, there’s a voltage drop in the connected circuit. In this moment of high inrush current, your lights may momentarily dim.
The following household equipment can cause this high inrush current:
- HVAC unit or dryer.
- Cooktops or microwaves. Some of these appliances operate by switching on and off at around a 1-hertz rate. For example, a microwave will cycle power on and off per its set timer.
- Old washers, where the motor reverses direction every half second. In agitator mode, the current draw will vary, causing voltage fluctuations.
In all these appliances, voltage fluctuations as low as 5 volts will cause issues. So, if your lights dim and/or flicker when these loads start up and run, you know your problem. One quick fix is to place these loads on a dedicated circuit. Otherwise, it’s a normal temporary issue you just deal with.
Important Note: Imagine you’re taking a shower and then someone flushes the toilet. All of a sudden, you notice the shower water pressure drops. This happens because a single water pipe feeds both your toilet and shower.
Similarly, think of voltage as electrical pressure. Voltage pushes current through an electrical line. So if there’s a high current draw from a motor start, the voltage will drop across all other circuit loads.
Think of a large motor starting, like someone flushing the toilet. For example, a starting AC compressor may draw 125 amps for a few milliseconds. Thereafter, a couple of seconds later, it’ll reach a steady-state current of 25 amps. This momentary voltage drop is unavoidable on motor start.
Troubleshooting Approach #3: LED light bulb condition
Do you have an LED light bulb installed?
LEDs are Light Emitting Diodes, which only allow current to flow in one direction. They use Direct Current (DC) to operate. While most regular lights use Alternating Current (AC).
LEDs work because they use AC to DC converters to operate when connected to AC. Without the converter, an LED will only be lit when the current flows in the right direction using AC. This causes flickering.
So if you have flickering, your LED light bulb may have internal damage. One quick test is to swap out your LED light with an incandescent light bulb. If the incandescent light bulb doesn’t flicker, your LED light bulb is your problem.
Important Note: Typical LEDs want roughly 2 volts DC across them. The voltage varies depending on the light’s color. The current draw can then range from a few milliamps to several amps. A 1000X swing. Due to this huge current variance, LEDs need a controlled current source.
An LED light bulb you buy will have built-in circuitry to support such current variances.
Troubleshooting Approach #4: LED light bulb dimmer
Is your LED light bulb designed with dimming capabilities?
Because you can’t install all LED light bulbs with dimmer switches. Non-dimmable LEDs are either fully on or off. The circuitry design isn’t made to handle low current levels.
Whereas dimmable LEDs can respond to varying current levels. So, check the type of LED light bulb you have installed.
One last check, was your dimmer originally connected to incandescent light bulbs? If yes, your dimmer probably isn’t compatible with LED light bulbs. Especially, if your home pre-dates 2010.
Important Note: There are two following types of dimmers:
Leading edge: designed for incandescent light bulbs. They’re the most common dimmers found in homes. These dimmer designs work with high-wattage loads, which incandescent light bulbs are. But, LED light bulbs are low-wattage. Thus, these dimmers can’t “control” their circuitry well.
Trailing edge dimmers: designed specifically to work with LED light bulbs. They have a much lower wattage range. Thus, they can “control” LED light bulbs effectively.
Electrician troubleshooting and fixes
These are electrical tests and fixes you can’t do yourself. You’ll need to reach out to a qualified electrician.
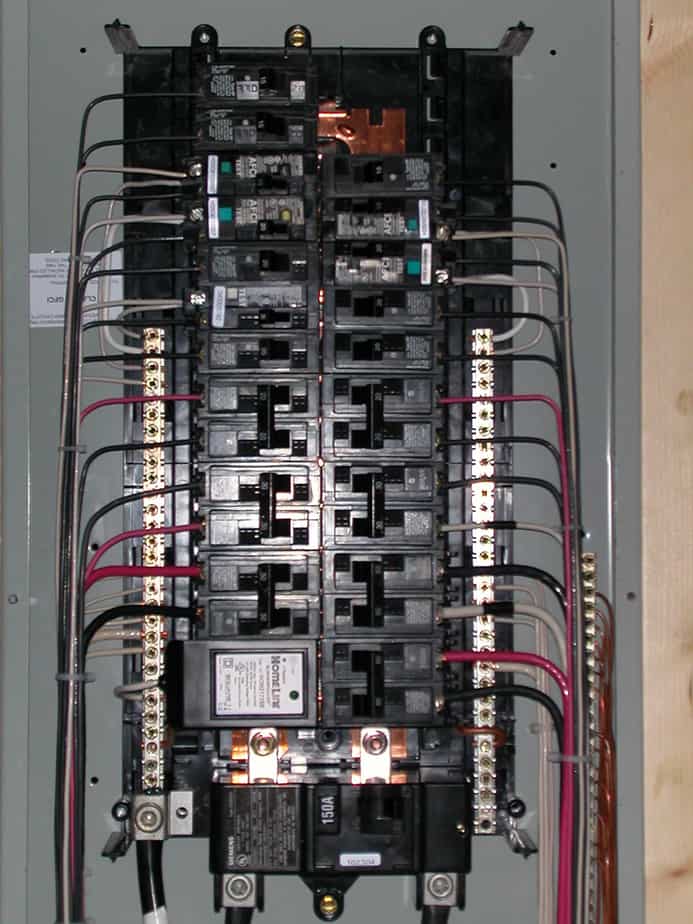
Troubleshooting Approach #5: electrical panel voltage measurements
First, have your electrician take voltage measurements inside your electrical panel. Measure directly on the incoming wires into your main panel. This will tell you whether the problem is from inside or outside of your home.
It’s always important to work your way in or out of a house with troubleshooting. The size of the home doesn’t matter either. The process is the same.
The measured line-to-line voltage should be around 240 volts. If the voltage reading is significantly lower, for example, 210 volts, there is likely a utility transformer issue. This could be due to the transformer being too small or simply old.
However, if there is only a small voltage drop, such as 8 volts, further measurements are necessary. Measure the line to neutral, 120 volts, to each hot leg. Check for excessive voltage drops or if there’s an imbalance. For example, one side may have a higher voltage reading than the other. If this is the case, there’s a neutral problem from the meter box to the utility transformer. The neutral problem can be in any one of the following:
- Transformer
- Wire routed from the transformer to the metering box
Finally, the electrician should connect a multimeter to the circuit with flickering lights. Then, record the minimum and maximum voltages, as another check if the problem is inside the panel or downstream.
Important Note: A quick trick is to get two matching incandescent light bulbs. Use low-wattage light bulbs, 15 watts, so they’re easy to stare at. Then, connect one light bulb to each phase at the main panel. Hold the lights next to each other and watch for the following to troubleshoot:
- Both light bulbs flicker: a problem at the panel or upstream with utility equipment
- One light bulb flickers: a faulty leg in the main panel
- One light bulb dims, while the other brightens: a neutral problem
- Both lights dim or brighten together: a problem with utility equipment
Troubleshooting Approach #6: thermal imaging inspection
Have your electrician search for hot spots using thermal imaging. This will give you accurate information on where to inspect further. Maybe you had a damaging short circuit inside your panel. This can cause flickering.
Important Note: Hot spots are areas with greater temperatures than their surroundings. Inside homes, hot spots are commonly found in walls, ceilings, and appliances. Also, they’re typically caused by the following electrical problems:
- Short circuits
- Poor insulation or degraded wire insulation
- Overloaded circuits
Troubleshooting Approach #7: feeder wire connection check
Have your electrician check for any loose wires. I’ve found loose wires are common with poor neutral bus bar connections.
To troubleshoot, electricians will remove panel breaker covers. Then, they’ll check the wiring connected to the neutral bus bar. Be sure they check for any hairline breaks in the neutral bar too.
If everything checks, the electrician needs to tighten all screws on the bus bar. This includes the main lugs in your panel. Next, they need to check for loose circuit breakers and their associated wires.
Finally, the electrician needs to check the switch box neutrals. Remove the switch cover plates and check if the wires are secure under their wire nuts. Vibrations from the following can cause flickering lights, through a loosened neutral connection:
- A slammed door
- Heavy home repair work
- Kids jumping on the second floor
Important Note: If you have an old house, you may have aluminum wires in your panel. These days, almost all new homes use copper wire by code. Copper is orange in color, while aluminum is gray.
The problem with aluminum wires is they can oxidize. This leads to a high-impedance connection, where not enough current reaches a light. The other issue is cold flow, where the aluminum wires become loose in a connection.
To address this issue, an electrician will disconnect and clean the affected wires. They’ll then apply a non-oxidizing protective coating before reinstalling the wires.
Another simple lighting test is to swap the wires from a problem circuit with a working circuit of equal ampacity. Then, check if the lighting problems continue. If they do, there’s probably a loose wire connection in one of the circuit boxes. For example, a switch box in a wall.
Troubleshooting Approach #8: main wire connection check
Have your electrician check for loose connections between your service wires and your main breaker. Also, check for loose connections between your main breaker and the bus bar.
By removing a panel cover, electricians can check all wire connections. As well, they can check for any burn damage inside your panel.
Local utility troubleshooting and fixes
If your electrician can’t figure out your problem, the next step is to go to your utility. The utility owns the equipment, which may be causing the next set of issues we’ll discuss.
Keep in mind, the utility will want to immediately fix any issues caused by their equipment. Because they’ll need to pay for damages to your household appliances. Or even worse, pay for brownouts and/or fires. So, don’t hesitate to call your utility company and explain your situation.
Important Note: If only a single light flickers, it’s an isolated issue. You probably only have a loose connection as discussed in earlier troubleshooting approaches. But, if all lights flicker in your home, you probably have a power utility issue.
Troubleshooting Approach #9: record incoming voltage
Have your local utility set up a recorder to monitor your voltage over a 24-hour period. The recording will help spot any voltage drops in your home. This should be the first approach, if nothing instantly catches the utility reps’ eyes.
Troubleshooting Approach #10: loose wire connection check
The local utility should check for any loose wire connections in your meter box. This home exterior mounted box, is in the jurisdiction of your local utility. So it’ll have a lock on it, preventing you and your electrician from getting inside.
I’ve seen cases where the utility has come and replaced the entire meter box due to old age. This brought the meter box up to code and fixed the flickering light issues.
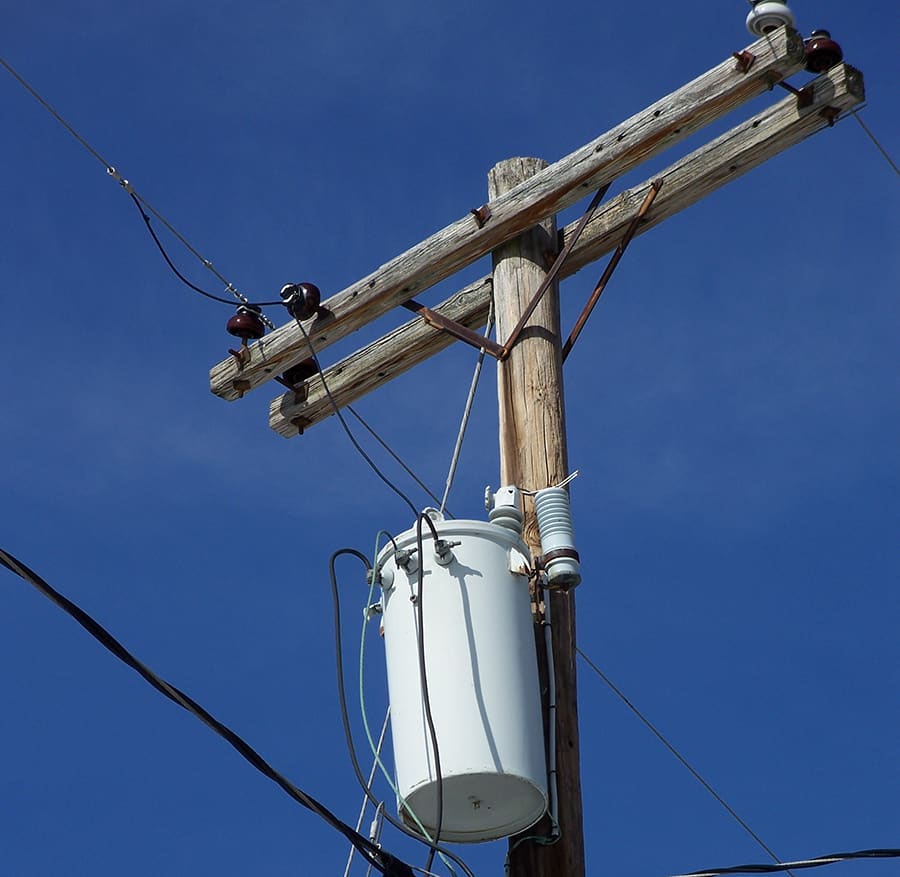
Troubleshooting Approach #11: utility transformer damage
The pole-mounted transformer feeding your neighborhood may have internal damage. In return, you and your neighbors will experience the same flickering light issues.
I suggest asking your neighbors if they’re experiencing flickering lights too. If they are, your lighting problems are probably from your utility’s transformer.
To fix the problem, your utility will send a lineman to check the overhead connections. If there’s a loose transformer connection, lights would flicker on windy days only. The utility can also check for a high-voltage reading on the ground lead. This may be indicative of a loose neutral connection at the transformer. Just as likely, the entire transformer is old and needs replacement.
Important Note: The local utility may not find any issues during their visit. They’ll say everything is fine, but don’t quickly accept their words. Bad transformer connections can damage equipment and cause fires.
There may be a loose connection, which becomes apparent only in storms. Or, there may be a faint buzzing sound they missed. Don’t shy away from telling them all your observations.
Troubleshooting Approach #12: overloaded utility transformer
The power system in your neighborhood may not have been properly designed. Realize a utility transformer typically feeds an entire neighborhood, not just your home.
A bad design includes adding excess loads to the transformer, without upsizing it. Or, feeding a large motor load from the transformer.
A transformer can only output a given amount of current before overloading. While the same issues I discussed in Approach #2, would come into play from loads outside of your home.
To address this matter, a utility would need to complete load calculations. They’ll need to determine if they need to upsize their transformer or not.
Important Note: Undersized wires can cause voltage drop for higher than rated current flow. Another factor is the length of the conductor run from the transformer to your home. You can better visualize this conductor length variable in a voltage drop calculation.
“How do I fix flickering lights?” wrap up
Follow these 12 troubleshooting approaches, to fix almost any home lighting issues.
Start with the easy checks, as most often you won’t need outside help. If the easy fixes don’t work though, call the professionals.
Just be sure you answer all the questions I outlined at the top part of this article. Provide as much information to your electrician and the utility as possible. They’ll then better be able to troubleshoot your problem.
Do you find flickering or dimming lights to be more common of a problem in your home? What do you typically find is the cause of flickering and dimming lights?