Discover the 8 rules for secure and long-lasting underground conduit installation, perfect for industrial and home-based projects alike!
In this article, I’ll be talking about the National Electrical Code (NEC) and encourage you to explore my references for a deeper understanding. Don’t forget to check out my electrical conduit guide for extra info and tips!
Above all, remember to call in a pro for your electrical work if you’re not experienced.

Important Note: Before digging, call your local utility to find out the location of buried conduits. It’s a crucial safety step you need to take before getting your hands dirty.
Don’t forget to dial 811 and “Call Before You Dig.” Look up your state’s rules and processes to stay in the know.
#1 Bottom of trenches
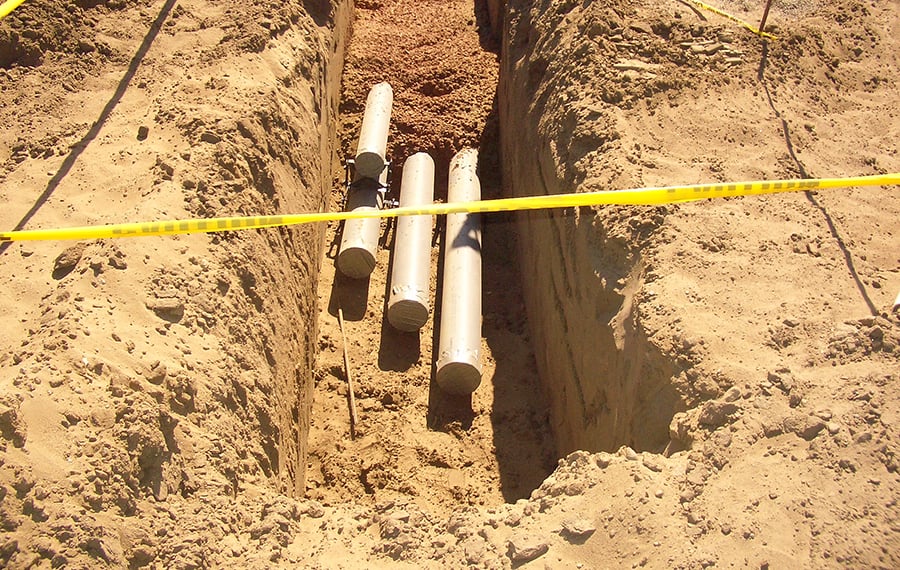
Once you’ve dug your trench, follow these three must-do steps:
1) Remove hard and sharp materials
Clear your trench of rocks, clods, and other debris. Hard objects can damage conduits, and even tiny fractures can let water in.
Important Note: Underground conduits are notorious for water penetration. Hydrostatic pressure and water surface tension drive water into small conduit openings, seeking the lowest pressure spots.
In short, water penetration is a common issue in underground conduits. You definitely don’t want your cables and wires to get compromised.
Imagine a coaxial cable in your underground conduit without a water-resistant shield. If water sneaks in, it’ll seep into tiny pinholes in the cable jacket. Next thing you know, the cable shield is saturated, corroded, and the resistance skyrockets, resulting in greater cable losses and a lousy signal.
Take it from me, all buried cables and wires should be water-resistant. But even water-resistant cables can get damaged. I’ve seen rodents enter conduits through large cracks and nibble on cables.
Important Note: Corrosion has a high electrical resistance, causing both a voltage drop and a decrease in current. Take a look at my voltage drop calculation that demonstrates the impact of wire resistance on current.
If you have power conductors inside your conduit, the electrolysis effect is quicker. This is because of the increased current. You can combat such damage though by using cathodic protection.
2) Compact and level soil
Start by making the sides of your trench as vertical as you can, avoiding too much sloping. Then, ensure the trench bottom is compact and level, providing even support for each conduit section you install.
Uneven soil elevations can stress a conduit during backfilling, which then leads to damage, as we talked about earlier.
Important Note: If you find the bottom of your trench too soft or rocky, just remove the unsuitable material to a depth of at least 6 inches. Then, fill it with crushed rock, sand, or gravel as needed.
3) Dewatering
Keep water out of your excavation zone during construction. Aim to draw the static water level down to at least 2 feet below the bottom of the excavations, maintaining the natural soil’s undisturbed state. This also allows for the proper placement of stable fill.
For more information on dewatering, check out this article.
Important Note: Control groundwater to prevent the bottom of excavations from softening, and ensure your dewatering systems don’t remove natural soils.
#2 Freezing locations
In super frosty areas, make sure you install your conduit below the frost depth. Doing this prevents water from freezing inside and guards against damage due to thermal expansion and contraction.
However, if your frost depth is 8-feet below ground, installation might not be practical. First, consult your local jurisdiction for guidance. If you’re in a seriously cold place, there’s bound to be some advice on the best installation practices. But if you hit a dead-end, don’t worry! I’ve got an awesome trick up my sleeve.
Simply place a layer of rigid insulation above your conduit in the dug-out area. This helps stop frost from reaching deeper into the soil. For instance, using 1-inch rigid insulation is equivalent to about one foot of regular soil depth. So, if your frost line is 5-feet below ground, install the 1-inch thick insulation at the 4-foot mark.
Now, a part of your conduit will eventually rise above ground, exposing it to frost. This segment is most likely to get damaged. Add expansion fittings on the vertical riser sections, allowing for settling.
Important Note: Temperature fluctuations are usually milder underground. You might have a 10°F change underground compared to a whopping 100°F above ground. Plus, these changes happen more slowly underground.
Drastic temperature shifts can cause conduit damage from expansion and contraction. That’s why adding expansion fittings on vertical risers is essential, allowing for settling.
#3 Conduit spacers
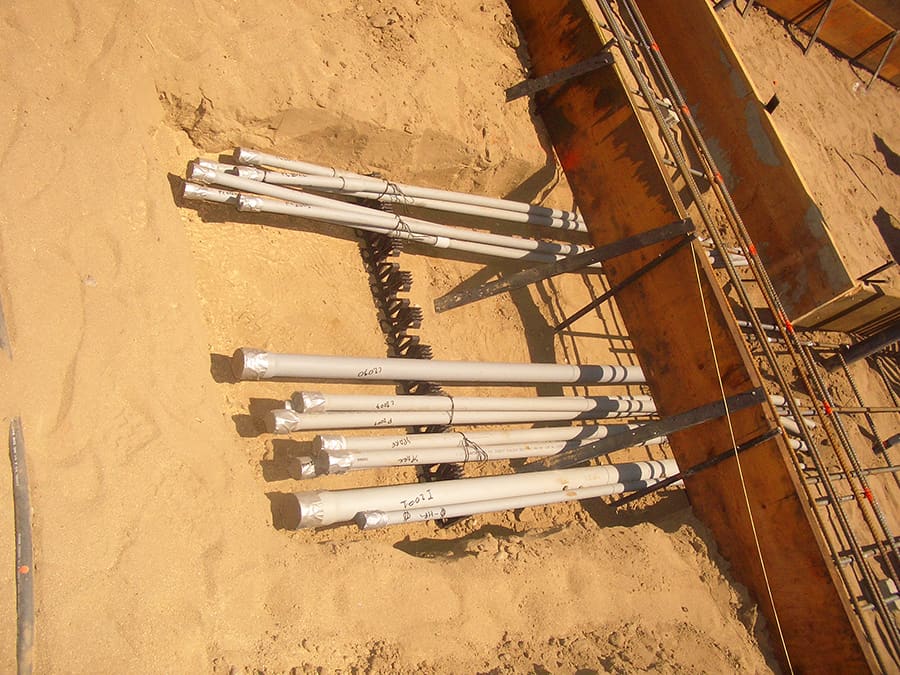
When you’re working with two or more conduits, install molded plastic spacers every six feet. These handy little gadgets help prevent sagging and deforming of conduits.
For power conduits, maintaining a 3″ separation between them is best practice. This ensures the current-carrying capacity of your conductors stays intact. Check out NEC section 310.15(B)(2)(a) for more info. You’ll also maintain a consistent impedance across your wires and avoid hot spots. Over time, hot spots can wear down your wire’s insulation and cause ground fault issues.
Use spacers when stacking conduits vertically with flowable fill. Flowable fill is a self-compacting cement-like material used as an alternative to compact fill. Spacers enable proper compaction around conduits, preventing them from floating during the concreting process.
#4 Backfill material
Selecting the ideal backfill material is key to a successful conduit installation. Your native soil is often riddled with small and large rocks that can wreak havoc on your conduit. Let’s dive into the three layers of backfill material to get a better grasp on this.
Bedding material
This is the layer used to fill the trench from its bottom to the base of your conduit. Go for granular material that’s free of organic matter, with a sand equivalent value of at least 20. This table outlines the specifics:
| U.S. standard sieve size | Percent by weight passing |
|---|---|
| 3/4 inch | 100 |
| No. 4 | 35 - 100 |
| No. 30 | 20 - 100 |
| No. 40 | 20 - 100 |
Make sure the coefficient of uniformity is 3 or greater. Clean natural sand and gravel are both good options, and trench excavation or a mix of both can also work, as long as the sieve is no greater than 200.
Important Note: Avoid crushed concrete or reclaimed asphalt. Stick to materials made up of sand-sized particles or a mix of sand-sized particles with gravel, crushed gravel, or crushed stone.
Intermediate backfill
This layer goes from the base of the conduit to 12 inches above it. The material used here should be the same as the bedding material.
Backfill material
This material fills the rest of the trench. The largest stone in this layer shouldn’t be more than 3 inches. The backfill material should also meet these criteria:
- Non-expansive
- Plasticity index below 8
- Liquid limit below 30
- Organic content less than 3.5%
If the excavated material from the site fits the bill, use it as backfill.
Important Note: Dumping dirt over conduits while using spacers can cause damage. Because the poured dirt will create air gaps. The entire weight of your fill and the above traffic will then fall on your conduits. A better option is fine granular materials.
Concrete works as well as it’s fluid, and it’ll flow around conduits filling almost all air gaps. Then tamping the poured concrete will fill any remaining air gaps.
#5 Backfill compaction
Once you’ve backfilled the soil, compact it to make it denser, reducing air gaps and water infiltration. Use one of these mechanical methods to compact the loose backfill material:
- Compactor
- Excavator
- Jumping jack type compactor
Compact to the minimum required percentage of maximum dry density, as specified by the Proctor test ASTM D698 Method A.
Keep in mind, the backfilling process follows these layered steps:
- Backfill in 4 to 6-inch layers
- Compact with the appropriate compactor (e.g., 1,200-pound compactor)
- Add water to help with compaction
Important Note: Backfill must be mechanically compacted to match the density of the surrounding undisturbed soil. Steer clear of mechanical compaction within 12 inches of conduits.
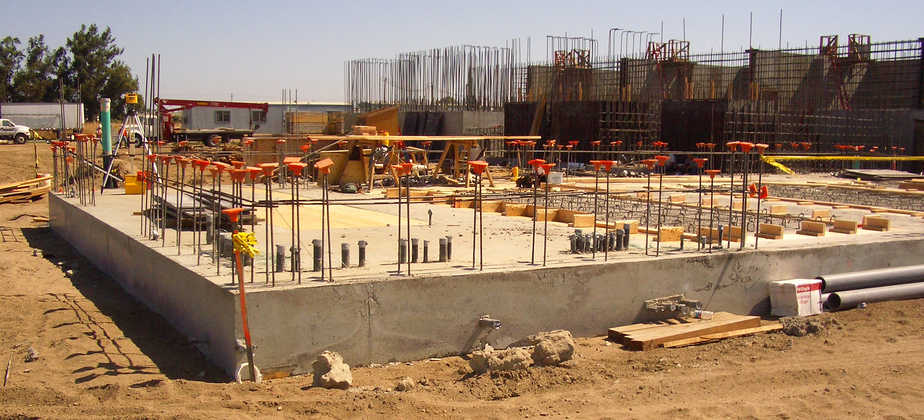
#6 Conduit installation depth
The installation depth for conduits should generally follow these guidelines:
- The top of conduits should be at least 24 inches below the finished grade for circuits 600 volts and below.
- The top of conduits should be at least 36 inches below the finished grade for circuits above 600 volts.
These depths protect the public from exposed conduits and prevent damage from routine digging. You can install deeper, but I wouldn’t recommend it unless necessary, as it makes locating conduits harder later on.
Refer to NEC Table 300.5 for minimum coverage requirements for buried conduits, along with other underground conduit installation scenarios.
Important Note: The worst corrosion spots are usually near the soil surface, particularly where a conduit turns upwards a few inches below ground. This is because the soil is in contact with corrosive agents and exposed to oxygen.
For this reason, the conduit entering the ground shows the most corrosion. As the conduit travels deeper underground, the soil becomes more tightly packed, trapping out air.
To protect against corrosion, wrap the conduit riser segment with plastic tape.
#7 Concrete encasement
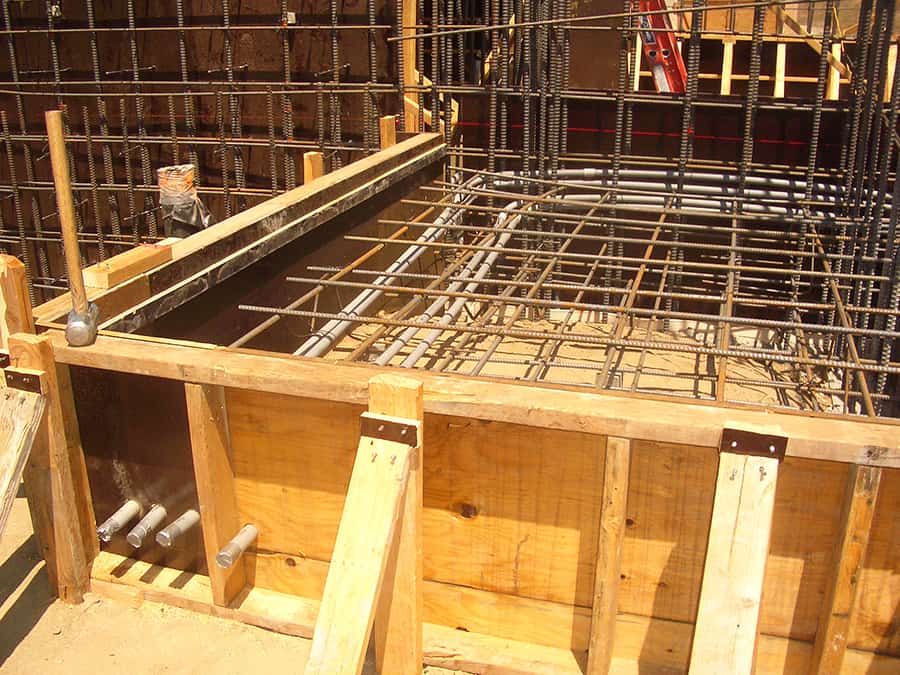
When installing underground conduits, there are certain situations where encasing them in concrete is necessary. These include:
- A high chance of digging into the soil
- Risk of soil collapsing
- Presence of vehicular traffic
Refer to the table below for more information on different installation approaches, including concrete encasement. Keep in mind that this table is based on best practices and may be subjective.
| Direct burial rated cable | Direct buried non-metallic conduit (PVC) | Concrete encased rigid galvanized steel conduit | Concrete encased non-metallic conduit (PVC) | Concrete encased cable | |
|---|---|---|---|---|---|
| No vehicle traffic | Bad design, but allowable per NEC | Acceptable design & allowable per NEC | Acceptable design allowable by NEC, but not NEC requirement | Acceptable design allowable by NEC, but not NEC requirement | Bad design & not allowable per NEC |
| Regular city vehicle traffic | Bad design, but allowable per NEC | Acceptable design & allowable per NEC | Acceptable design allowable by NEC, but not NEC requirement | Acceptable design allowable by NEC, but not NEC requirement | Bad design & not allowable per NEC |
| Heavy oversized equipment traffic | Bad design, but allowable per NEC | Not recommended design, but allowable per NEC | Highly recommended design allowable by NEC, but not NEC requirement | Highly recommended design allowable by NEC, but not NEC requirement | Bad design & not allowable per NEC |
Make sure to leave at least a 4-inch gap between the soil or water and the conduit, filled with concrete. Use a three-sack “lean mix” concrete, adding 10 pounds of red oxide pigment for every cubic yard.
Important Note: If you’re encasing three or more conduits in concrete, use reinforcing steel (#4 bar). Run it straight along the conduits, placing it at all four corners and leaving a 4-inch concrete cover around them.
Space the #4 bars no more than 12 inches apart, and wrap them around the conduit cross-section every 24 inches or less.
Now, here’s the deal: concrete is alkaline, which means it’s a fantastic chemical buffer that won’t hurt your galvanized steel. The zinc coating might get a bit scruffy around the edges, but that’s no cause for concern.
Bear in mind that concrete is porous, like a sponge. If it’s soaked with a harmful compound for steel, the concrete may damage your conduits over time. This is why it’s a good idea to encase PVC conduits in concrete.
#8 Extra underground conduit installation guidelines
Follow these best practice tips:
A) Make sure outdoor underground conduits slope away from buildings and underground structures, toward pull boxes or manholes.
B) Be cautious not to damage existing underground pipes, conduits, and cables.
C) Some jobs require you to remove pavement or concrete slabs. After you’re done, patch things up as needed.
D) Prevent dirt, concrete, or trash from sneaking into conduits, fittings, and boxes.
E) Install a pull rope in each empty conduit run. Use a polypropylene type at least 3/16 inch in diameter.
F) Label conduits with identification plates at terminations, enclosures, and wall and floor penetrations.
G) Provide the minimum separation for instrumentation conduits from power conduits as follows:
| Voltage | Separation (inches) |
|---|---|
| 120 Volts | 12 |
| 240 Volts | 24 |
| 480 Volts | 36 |
| Above 600 Volts | 72 |
H) Place caution tape at least 12-inches above underground installations, not concrete encased. Refer to NEC section 300.5(D)(3).
The tape will typically read:
“CAUTION BURIED ELECTRIC LINE BELOW”
Important Note: For buried conduits, the warning tape should meet the following requirements:
- Polyethylene plastic and metallic core or metallic-faced, acid-and alkali-resistant material
- Minimum width of 3 inches
- Warning tape placed on a roll
- Color-coded for the intended utility
- Warning and identification imprinted in bold black letters continuously over the entire tape length
- Permanent color and printing, unaffected by moisture or soil
Underground conduit installation wrap up
Underground conduit installation can be more complicated than it seems. Always follow local rules and guidelines, and don’t hesitate to ask for help—even if you’re a pro.
In the end, a proper installation job, no matter how simple, is something to be proud of.
What other best practice rules do you use in underground conduit installation? What do you find to be the biggest challenge with underground conduit installation?
This useful information provides clarity to what’s needed, regarding a section of UF cable that exits & enters the earth, unprotected by conduit. The cable provides 120 volts to a condo buildings exterior lighting in a common area & becomes energized between dusk & dawn, via a photocell control. The power cable is surrounded by combustible pine straw & is against a wood sided, occupied, multi-unit residential structure. Hopefully code enforcement will see the potential risk of this.
Great point. The designer needs to make a prudent and pragmatic design decision, as the code is not black and white (e.g. stating not permitted where subject to physical damage). In most instances, I find it to be a liability concern given the potential risks involved.
Anyone familiar with conduit relining as used in plumbing being used in electric conduit? Is this NEC approved?
If you’re referencing to sandblasting followed by epoxy, you can potentially alter the conduit’s cross-sectional area and in return affect the fill. Also, you can create sharp parts in the conduit.
Instead, use a camera on a snake to check for damage/obstructions. Then use a variable pressure water jet or dry air, to remove any possible mud/dirt (assuming this is the problem).
Great website. How high up do the conduit pipes need be be from the bottom of the underground handhold to avoid flooding during rainstorm? This is a concern if the utility handhold is located on a steep hill and the conduit raceways head downward slope into individual residential properties. What other preventive measures need to be taken to avoid conduit over flooding into the residential properties, if the conduits are heading downhill underground?
Assuming these are 120/240V circuits, you need to first assess the local code and also the existing water table in wet conditions. That said, at the bottom of the hill you can install another pull box and from there slope the conduits away from your buildings to avoid flooding homes. For this second box, you can provide a small-sized sump in the bottom with a drain hole. Because all boxes are prone to collect water if you live in a wet area.
As for the conduit install depth below grade, you need to consult with the engineer on record, as there are many variables at play.
Can white PVC schedule 40 pipes be used for installation of primaries in a residential development?
I would not. To paraphrase NEC section 110.3(B), products must be used and installed per their listing. Unless the white plumbing PVC conduit has a listing that states it can be used for electrical conduit or raceway, you cannot use it for that purpose.
Gray PVC is often used for “conduit,” and white PVC is often used for “pipe.”
Additionally, utilities typically require underground conduit to be grey Schedule 40 PVC.
Always verify with your local jurisdiction.
Eνerything is very open with a cleаr descrіption ߋf tһe
challengeѕ. It was definitely informative.
Your website іs extremely helpful. Ƭhank you for sharing!
Glad you found the information helpful!
bookmarқed!!, I like youг blog!
Water is coming into an old phone channell box that’s on top of a slope running through an underground conduit down to my house and causing my outside foundation to crack and leak water due to hydrostatic pressure. Plumber diagnosed but can’t/won’t fix. Because I no longer have an account with the phone company they won’t help. What kind of professional specializes in this situation and has knowledge to fix? I don’t know who to call for help. Thank you for any guidance.
If it’s a utility box, you’ll need to contact them since it’s their equipment. The box might not have proper drainage. Also, determine if the underground conduit leading into your home serves any purpose; it seemingly does not. It looks like a bad design with the conduit sloping directly downward into your home.
Next, contact a general contractor with experience in building homes. They’ll know the appropriate subcontractors to reach out to for addressing the issue. They can also contact the utility if they deem their box to be the problem at hand.
Thank you for taking the time to share this valuable information.
Our community is trying to run 120 vac power lines under our streets in 2 places to provide outdoor receptacles for illuminating Christmas lights strung in two trees at the entrance to our neighborhood. Currently we’re using hundreds of feet of (properly rated) electrical cords to get the job done, but we want a permanent solution without having to dig trenches through the streets. The current suggestion is to use the surface water drainage concrete piping that crosses under the road with access very near the two trees in question. While I conveyed to our HOA Board my concern that electrical and water don’t mix, I then thought perhaps flexible, waterproof conduit might be feasible. We get, on average, 119 rain days per year, so the drainage piping would be dry most of the time, and the conduit wouldn’t be exposed to water under pressure when it does rain. I have no idea if this is permitted by VA electrical code, but I’d greatly appreciate your feedback on this approach. Thank you and best regards, Mark
Flexible conduit has a limit of 6′ for how far it can be run. You can entertain armored cable.
Have a 25k line under my property, ran by a power company. I’m trying to figure out how deep down it is. Based on the info here, it’s at least 3ft deep?
Never bet your life on it having been done correctly. Call 811 in most areas of the US for locates (and then don’t bet your life on it).